Create Facebook App For Website-Facebook Domain Verification
This tutorial is aimed at helping you create a Facebook website application and connect it with web pages via Meta tags of the Open Graph Protocol, thus monitoring important metrics of your website.
Monitoring the metrics is a very important step if you are using paid content promotion, so that you get a clear insight into the number of people who saw your content, whether they liked it or not, and how many times the target group and users have shared it, i.e. the way they have interacted with it.
As opposed to classic “share” buttons and other content- and page-sharing options, a Facebook app will monitor all likes and shares on profiles and profile walls where the URL of the website for which you have created the app appears, and which also communicates and collects data from the very web page via the Open Graph Protocol.
Because in this way you can verify your website domain in Facebook so you site link will not get blocked if you share too much in Facebook.
Following steps to create Facebook APP:
1. Log in to your Facebook account.
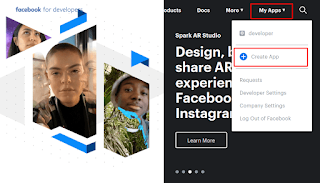
2. Go to https://developers.facebook.com/ click on My Apps and press Create App.
 3. Set the Display Name of your application.
4. Enter the Contact Email.
 5. Navigate to Facebook Login and press the Set up button.
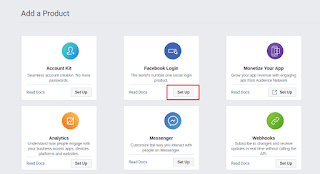 6. Select Web from the displayed platforms.
 7. Go to the Settings section and choose Basic.
8. In the menu, some fields are auto-generated. Fill out the remaining fields including App Domains and Contact Email (both required). Privacy Policy URL and Terms of Service URL are optional, but we recommend filling them out to switch your application to live mode.
Monitoring the metrics is a very important step if you are using paid content promotion, so that you get a clear insight into the number of people who saw your content, whether they liked it or not, and how many times the target group and users have shared it, i.e. the way they have interacted with it.
As opposed to classic “share” buttons and other content- and page-sharing options, a Facebook app will monitor all likes and shares on profiles and profile walls where the URL of the website for which you have created the app appears, and which also communicates and collects data from the very web page via the Open Graph Protocol.
Why you should create app in Facebook for your website:
Because in this way you can verify your website domain in Facebook so you site link will not get blocked if you share too much in Facebook.
Following steps to create Facebook APP:
1. Log in to your Facebook account.
2. Go to https://developers.facebook.com/ click on My Apps and press Create App.

4. Enter the Contact Email.


8. In the menu, some fields are auto-generated. Fill out the remaining fields including App Domains and Contact Email (both required). Privacy Policy URL and Terms of Service URL are optional, but we recommend filling them out to switch your application to live mode.
9. Once you've filled all the necessary fields, press the Add Platform button to move to the next step.


12. To access the Facebook Login section, go to Settings and click on it.
13. Enter your valid OAuth Redirect URLs. The specific method for obtaining this URL may vary depending on the software you are using. Usually, it can be found in the software's settings information.
14. Make sure to enable the Enforce HTTPS option as Facebook has a default setting for this.
15. Click on the "Save Changes" button and then switch your Facebook app to Live Mode.


0 Comments